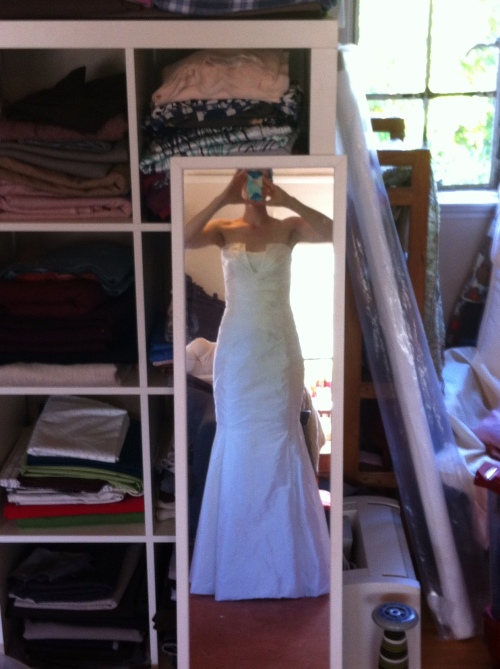
At this point, I've totally lost track when things got done with the dress. And, sadly, looking back through my photos I really only have a few. That's because at some point the following things happened, none of which were really worth taking photos of:
1. I discovered a small blood stain on one of the front panels of the dress. It was dried, so no amount of spit helped get it out. And then (worse) I ended up with very small, almost invisible blood-stain with a much larger and more visible spit stain around it. Sigh. [Actually, I probably should have taken a photo of it, but I clearly wasn't thinking properly at the time. Instead of frantically wondering what to do I should have calmly taken a photo and immediately uploaded it to my blog. Obviously.] Anyway, solution: rip out the side seams and flip the front panels so that the bottom was on top (they are mirror images of each other), thus hiding the blood/spit stain on the other. So, that took about a day.
2. I decided that the dress needed to be taken in through the waist. Solution: rip out the zipper and take in the back seam.
3. Moved the waist stay down another inch or so (again!).
4. Discovered that the corselet needed to be taken in to keep the dress smooth down the sides. Removed the boning, took in all the seams, then replaced the boning.
5. Sewed the corselet and lining to the dress and flipped them inside.
6. Took the zipper out again after realizing that the corselet needed to be sewn into the zipper to keep the back smooth.
7. Prick stitched (in blue thread!) the lining to the seam allowance of the dress neckline in order to it would stay in place.
8. Re-hand sewed the zipper (for probably the 7th or 8th time at this point)
9. Basted the corselet and the dress together at the skirt seam, adding stay tape for stabilizer.
10. Assembled the skirt pieces. Cut and assembled the lining skirt pieces.
11. Attached the skirt pieces to the dress.
12. Hated it. Good-freaking-grief that was one large, unweildy, and badly draping skirt. It wasn't the pattern–it was the fabric. This stuff was like vellum–gorgeous, thick, and with almost no drape. Actually, it looks alright in this pic, but that's because it was perfectly posed and didn't move. As soon as I wore the thing, it went funky at every angle, including popping up in the back where the skirt seam met at a point with the back seam:
13. Basted in the horsehair braid along the bottom, hoping that would help. Fail.
14. Got desperate and tried bustling the skirt. Terrible.
15. Cut off the train. Success!
16. Honestly, I should have done it months ago. The skirt wasn't as full, obviously, but so much more manageable and draped beautifully without all the reams of fabric hanging off the back. It was super easy to wear, it draped beautifully, and it was still a very full skirt that I got to wear for the entire wedding and reception, not just the ceremony. Loved it.
17. Probably took out the zipper a few more times. My memories are hazy at this point.
18. One week to go, I finished everything except hemming the skirt. A friend came over and marked it for me–he did a great job– and then I hand hemmed the blasted thing all in one night so that we could take it to the cleaners and have it pressed. It took probably 6 hours, plus another hour of redoing a few points where it was too short or too long.
19. Added 55 buttons (decorative only) down the back. I ordered the buttons from Lace&Co and they were perfect–professional and matched the dress exactly.
20. Ordered some cool peach sequin fabric to make a shrug (never got to it, but didn't need it anyway) and then ended up using the fabric instead to make about 20 tablecloths for the reception. No sew double-sided sticky tape is your friend!!
So that's it–the one photo I have (a crap selfie in the mirror, no less!) from finishing the dress. I can't believe I forgot to take any other photos of it. At any rate, there will be a ton once the photographers send along their CD from the wedding, so I'll post some then, too. Sadly, a lot of pleating in the bodice isn't visible in this photo, but then I didn't really think it would be (the white causes it to blend in a lot). The bodice, though, is exactly how I wanted it to look–really striking even in this photo. Woot!


Oh wow!! But the selfie in the mirror looks GORGEOUS. I absolutely adore that shape of dress – one of my favourites tried on was very similar to this. It drapes beautifully at the front to the floor – I’m excited for you!
Thanks!! It was a great dress to wear (especially without the train). Very swirly and the silk (the shantung on the outside and the charmeuse on the inside) was incredible. The original dress I modeled this after was Amy Kuschel’s Fillmore, in case you’re looking to try on another dress with a similar shape to it. I don’t know if she sends them over to Australia, though 😉